How To Draft A Basic Skirt Pattern.

Hello. In this post, we will learn how to draw a basic flare skirt pattern.

This is a sewing pattern I recommend for beginners. Start by drawing the pattern and practicing with woven fabric. Once you create a basic skirt pattern based on your body measurements, you’ll be able to design and make any new style that fits perfectly.


Before that, let me explain the abbreviations used when drawing a skirt.
When drawing clothing patterns, we need to draw them according to your body size, so we need body sizes. The sizes used here are waist and hip circumferences.

Waist and hip circumferences are measured using the front numbers, w and h. Check the formula in the drawing below.


W : Waist circumference
HHip circumference


How to draft the basic skirt pattern step-by-step

Let's start the calculation from the corner of the paper. Calculate 3.14 for the waist circumference. Check the two places where you calculated the value.


If you measure the value calculated from Moriri, you will be able to draw the waist circumference of the curved skirt.


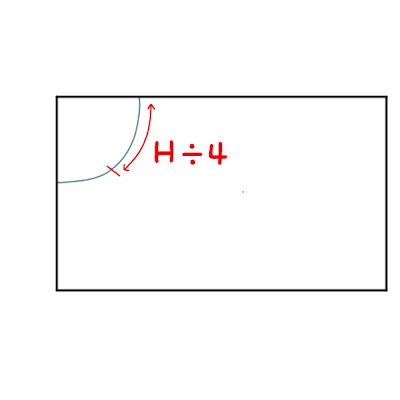
I will start measuring again from the end of the drawn curve. I will calculate the hip circumference because you will need to put your hips in when you wear the skirt. Divide the hip circumference by 4 and mark that value on the curve. You can give 1-2cm of margin. The place you just marked will be the side seam of the skirt.


I will draw a straight line from the marked place. (Please draw a straight line so that it is perpendicular to the curve.)


You can draw this line as long as the skirt. The basic length of the skirt is 60cm~70cm, but you can make it any length you want.


Cut out the created skirt pattern, place it on the fabric folded in half, and cut the skirt fabric.
All seam allowances should be 1cm, but the bottom of the skirt should be 3cm.




Have a happy sewing day~


Comments

Popular posts from this blog

basic zippered box pouch free pattern

basic rectangle pouch free pattern PDF free pattern download☝️☝️ DIY :) zippered box pouch with lining Hi I made a box pouch with lining. This pouch can make the lining clean. We need a 40 cm * 28 cm outer piece and 20cm * 28cm lining pieces and fusible fleece and 5cm * 5cm pull tabs. and we need a 28 cm zipper. We also need a zipper foot to sew the zipper. If you are drawing a pattern by yourself, see the picture below. See YouTube videos for instructions on how to make it. Make a pouch and give it your loving family and friends. No matter what fabric you use, the pouch will look great.

Linen Blouse PDF free pattern download (HappyDandongTV)

Blouse PDF free pattern download 👇 Blouse free pattern (HappyDandongTV) Watch the video to see how to make a blouse. The video will be uploaded at 10 p.m. Summer is coming to South Korea. The sun is already hot in Daegu where I live. So I made summer clothes. You can draw the pattern yourself or download the free pattern. I made a blouse with linen. The width of the chest in this pattern is 35 cm. Cut the pattern and cut the fabric. If you want to make a longer blouse, add 20cm. You can cut the blouse to the length you want. Now we need to cut a lining to cover rough edges I made it using the lining pieces, not the bias, on the neckline. ☝️ This is lining.  Press Fold the edge 1cm and press it. And sew around the sides edge. The last thing you'll need to do

Pencil Case free patterns download

Hi everyone, Today I made a pencil case. YouTube >>  How to make a pencil case This case has a lining. The length of the pencil case is about 8 inch, so you can also put a colored pencil. Pencil case PDF free pattern download 👇 https://drive.google.com/file/d/1ykF4bke7HniEf3_-AY0t_fCJZgKZfI4F/view?usp=sharing